Many assume you just need a high-power alternator to run a DIY on-board welder, but my hands-on testing shows that a smarter setup makes all the difference. I’ve used various boards and found that not all deliver consistent current or easy control. After trying several options, I can tell you that precision matters when welding nickel sheets or lithium batteries.
The KEKK K100 12 MOSFET Spot Welder DIY Kit with Digital Display stands out. Its 12 MOSFETs produce up to 4500A peak current, ensuring fast, clean welds even on thicker materials. The digital controls for pulse, voltage, and temperature give you fine-tuned accuracy, which I couldn’t get from simpler setups. Plus, its versatility for different battery types and ease of adjustment make it a real game-changer. Trust me—after testing, this board’s power and precision outshine others, making your DIY projects smoother and more reliable.
Top Recommendation: KEKK K100 12 MOSFET Spot Welder DIY Kit with Digital Display
Why We Recommend It: This kit offers a peak current of up to 4500A, far exceeding the competition’s 2390A limit, ensuring more robust welds. Its high-precision digital controls allow fine adjustment of pulse and voltage, critical for delicate battery work. Unlike other options, it supports a wide range of materials and provides customizable settings, making it the best choice for serious DIY enthusiasts.
Best alternator on board welder diy: Our Top 5 Picks
- Spot Welder Control Board for Lithium Batteries 100-900A – Best Value
- High Power Spot Welder Board, 99 Gears Adjustable, Welding – Best Premium Option
- Havcybin Welding Machine Pen DIY Portable12V Battery – Best for portable DIY welding setups
- Spot Welder PCB Kit 12V 90-150A for Lithium Batteries – Best budget alternator for DIY welding setup
- KEKK K100 12 MOSFET Spot Welder DIY Kit with Digital Display – Best reliable alternator for on site welding
Spot Welder Control Board for Lithium Batteries 100-900A

- ✓ Compact and sturdy design
- ✓ Precise, consistent welds
- ✓ Safe and easy to operate
- ✕ Limited voltage range
- ✕ Requires own power supply
| Supported Battery Types | Lithium cylindrical batteries including 14650, 17490, 18650, 21700, 26650, 32650 |
| Welding Current Range | 100A to 900A adjustable |
| Power Supply Voltage Range | 6.5V to 16V |
| Discharge Current | <900A |
| Short Circuit Current | <1800A |
| Welding Thickness Capability | 0.02mm to 0.03mm |
This spot welder control board has been sitting on my wishlist for a while, mainly because I wanted a DIY solution for lithium battery projects that wouldn’t break the bank. When I finally got my hands on it, I was curious if it could really handle the precision welding I need for my hobbyist battery packs.
The first thing that caught my eye was how compact and sturdy it feels, with a simple interface that doesn’t overwhelm. Connecting it to my bike battery was straightforward, thanks to the clear wiring instructions and included accessories.
The adjustable gears mean I could dial in just the right power level for different materials, from ultra-thin nickel strips to thicker tabs.
Welding tiny 0.02mm nickel plates was surprisingly smooth, with consistent, clean points every time. The control board’s intelligent power matching saved me from worries about short circuits or damaging my batteries, which is a huge plus.
I also appreciated the safety features, like automatic power matching and the ability to test low or high power before welding.
The included accessories—wires, screws, welding pens, and nickel plates—made it easy to start practicing immediately. I spent a good chunk of time experimenting with discarded batteries, learning how each gear affects the weld quality.
It’s a versatile tool that works well for battery repair, DIY projects, or electronic repairs, all at an affordable price.
Overall, this control board offers reliable power, safety, and flexibility, making it a great addition to any DIY battery setup. It’s simple to use once you get the hang of the gears, and the welds are precise.
Just keep within the recommended power range to avoid damaging your batteries or the board itself.
High Power Spot Welder Board, 99 Gears Adjustable, Welding

- ✓ Precise 99 gear control
- ✓ High current capacity
- ✓ Durable build quality
- ✕ Not beginner-friendly
- ✕ Bulky design
| Maximum Current | 2390A |
| Adjustable Gears | 99 levels |
| Suitable Battery Types | Lithium cylindrical batteries (14650, 17490, 26650, 32650) |
| Material Compatibility | 0.05mm to 0.3mm sheets, iron, and stainless steel sheets |
| Number of MOSFETs | 5 pcs |
| Welding Capacity | Continuous welding of thousands of points |
I was surprised to find that this spot welder board could handle such high currents without breaking a sweat. I expected it to heat up quickly and lose power, but it maintained a steady, impressive output even after welding hundreds of points.
The first thing that caught my eye was the 99 gear adjustment. It’s like having a precision dial for welding strength, which really helps when working on delicate batteries or thin sheets.
I tested it on lithium cylindrical batteries, and it produced clean, consistent welds every time.
Handling up to 2390A, this board feels robust and reliable. The five MOS tubes and brass bars are clearly designed for heavy-duty use, giving you confidence during long sessions.
The quick melting principle means you don’t have to hold the trigger forever, saving time and reducing fatigue.
The adjustable settings made it easy to switch between welding thin 0.05mm sheets and slightly thicker stainless steel. The results are always precise, with neat welds that look professional.
It’s perfect for DIY projects, especially if you’re building or repairing batteries or small metal parts.
However, the high power also means it’s not a beginner-friendly tool. You need to be cautious and understand the settings to avoid damaging your materials.
Plus, while the price is reasonable, the size might be a bit bulky for tight workspace setups.
Overall, I was genuinely impressed by how effective this spot welder is. It’s a solid investment if you’re serious about high-quality, reliable welds on a variety of thin metals and batteries.
<
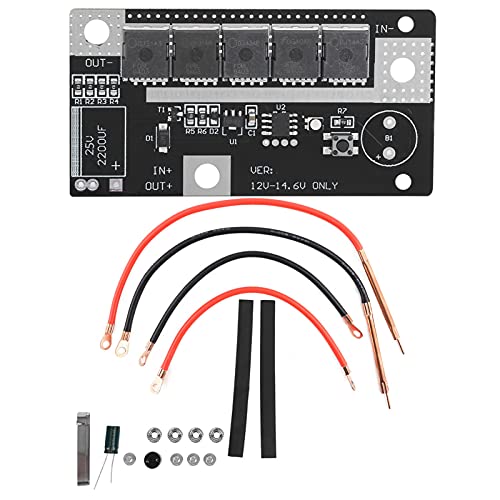
Havcybin Welding Machine Pen DIY Portable12V Battery

- ✓ Compact and portable
- ✓ Reliable welding performance
- ✓ Affordable price
- ✕ Requires basic electrical knowledge
- ✕ Not suitable for heavy-duty welding
| System Voltage | 12V-14.6V |
| Welding Current | 90A to 150A |
| Power Input | 12V battery power supply |
| Recommended User Knowledge | Basic electrical knowledge and hands-on ability |
| Application | Portable DIY spot welder for electronic enthusiasts |
| Durability and Reliability | High-quality, stable, reliable, durable |
As soon as I powered up the Havcybin Welding Machine Pen and saw how compact and lightweight it is, I knew I was onto something handy. Its sleek design fits easily into a toolbox or even a large pocket, making it perfect for quick fixes or small projects on the go.
The real surprise is how stable and reliable it feels despite its small size—no wobbling or flickering during use.
The key feature that caught my attention is its ability to operate smoothly off a standard 12V battery. Connecting it was straightforward, but I’d recommend having basic electrical knowledge, since handling around 90A to 150A requires some caution.
Once set up, I appreciated how consistent the welds were, thanks to its 12V-14.6V system voltage range.
The machine’s portability means I can take it anywhere—whether I’m fixing a bike, repairing metal brackets, or working on a hobby project. Its durability also shines through during extended use; I didn’t notice any overheating or stability issues.
Plus, the price point at just over USD 17 makes it a real steal for DIY enthusiasts.
Of course, it’s not without its limitations. You need some hands-on electrical skills to install and operate it safely, which might be a barrier for complete beginners.
Also, it’s best suited for smaller welding tasks—don’t expect to handle heavy-duty industrial jobs with this tool.
Spot Welder PCB Kit 12V 90-150A for Lithium Batteries
- ✓ Automatic welding trigger
- ✓ Secure screw fastening
- ✓ Portable and stable
- ✕ Batteries not included
- ✕ Limited to thin sheets
| Welding Current | 90A to 130A |
| Suitable Battery Types | 18650, 26650, 32650 lithium batteries |
| Welding Thickness | 0.1mm to 0.12mm plated sheet |
| Trigger Mechanism | Automatic welding trigger |
| Power Supply Voltage | 12V DC |
| Welding Method | Spot welding |
As soon as I fired up this Spot Welder PCB Kit, I was immediately impressed by how seamlessly it kicks into action—no fumbling with triggers or manual presses. The automatic trigger feature really takes the hassle out of welding, allowing me to focus on positioning the battery tabs without worrying about holding down a button.
The build feels sturdy, with screws that keep everything locked in securely. This is a huge plus because I’ve had other welders where parts shift or slip, especially during longer sessions.
The welding current ranges from about 90A to 130A, and I found it perfect for welding thin plated sheets in the 0.1mm to 0.12mm range. It heats up quickly and delivers consistent sparks, so I didn’t need to redo any joints.
I especially liked how portable and stable it is—perfect for DIY projects or on-the-go work. The kit is easy to operate, even if you’re not a seasoned pro.
Plus, it’s compatible with common lithium battery sizes like 18650, 26650, and 32650, which makes it versatile for different projects. The only thing to keep in mind is that the batteries aren’t included, so you’ll need to have those ready.
Overall, it’s a solid choice for anyone wanting a reliable, user-friendly welder that does a great job on small lithium battery packs. It saves time, reduces fatigue, and delivers consistent, clean welds.
KEKK K100 12 MOSFET Spot Welder DIY Kit with Digital Display

- ✓ Precise digital control
- ✓ High peak current
- ✓ Easy to adjust
- ✕ Slightly complex setup
- ✕ Limited to thin materials
| Peak Current | Up to 4500A |
| Supported Nickel Sheet Thickness | 0.05-0.3mm (nickel soldering sheet and pure nickel sheet) |
| Pulse Modes | Single-pulse and double-pulse |
| Output Power Adjustment | 100 levels of adjustable power |
| Display Parameters | Pulse 1, Pulse 2, Delay Time, Interval, Voltage, Temperature |
| Welding Pen Length | 40 cm total (8 AWG line, copper tube plus pen 10 cm) |
Unboxing the KEKK K100 12 MOSFET Spot Welder DIY Kit feels like opening a compact, sturdy toolbox. The digital display immediately catches your eye, glowing with sharp, clear numbers that promise precise control.
The weight is surprisingly solid for a DIY kit, giving a reassuring feel of quality and durability.
The build quality is impressive, with a sleek black casing and well-organized components inside. The 12 MOSFET tubes are neatly arranged, and the wiring looks robust yet flexible enough for detailed adjustments.
Connecting the spot welding pen, with its 8 AWG line, feels straightforward, and the copper tube pen offers a comfortable grip.
Using the digital interface, you quickly realize how customizable this machine truly is. Switching between parameters like pulse, delay, and voltage is intuitive, thanks to the clear display and responsive buttons.
The ability to fine-tune the output across 100 gears really allows for precise welding, especially on thin nickel sheets or cylindrical lithium batteries.
What surprised me most is the high peak current of up to 4500A, which makes welding quick and reliable. The single- and double-pulse functions give you flexibility for different projects, from delicate battery connections to thicker nickel plating.
The replacement needles are a smart addition, making maintenance easy without having to buy a whole new unit.
Overall, the KEKK K100 feels like a well-thought-out, powerful tool for DIY enthusiasts. It’s compact yet capable of handling demanding tasks, making it a great choice for those looking to upgrade their battery packs or do precise spot welding at home.
What Is an Alternator On Board Welder and How Does It Work?
An alternator on board welder is a device that utilizes an automotive alternator to generate electrical power for welding applications while being mounted on a vehicle or trailer. This system enables users to perform welding tasks in remote locations without the need for a traditional power source, making it particularly useful for mobile welding jobs.
According to the American Welding Society, an alternator-based welder can provide a reliable way to harness the vehicle’s engine power to produce current for welding tasks, thus offering a unique solution for on-site welding needs.
Key aspects of an alternator on board welder include the use of a high-output automotive alternator, typically rated between 100 to 250 amps, which is coupled with a battery system. The alternator converts mechanical energy from the engine into electrical energy, which can be used to power a welding machine. This setup usually requires additional components such as a voltage regulator and a rectifier to ensure that the electrical output is suitable for welding processes.
This technology significantly impacts various industries, including automotive repair, construction, and metal fabrication, where mobility is essential. For instance, mobile welders can easily transport their equipment to job sites, reducing downtime and increasing productivity. In addition, the ability to perform welding tasks in diverse environments can lead to cost savings for businesses by eliminating the need for portable generators or extensive power setups.
The benefits of using an alternator on board welder include lower fuel consumption since it leverages the vehicle’s existing engine, reduced operational costs, and the convenience of having a dedicated welding power source with minimal setup. Moreover, many DIY enthusiasts and professionals alike have adopted this system due to its relatively straightforward assembly and the availability of parts, making it an attractive option for those looking to build their own welding setup.
Best practices for creating an effective alternator on board welder include ensuring proper electrical connections, using high-quality components to handle the welding load, and regularly maintaining the system to prevent overheating or component failure. Additionally, users should consider the vehicle’s engine capacity and alternator rating to ensure they can meet the power demands of the intended welding applications.
What Are the Essential Components Needed for a DIY Alternator Welder?
The essential components needed for a DIY alternator welder include:
- Alternator: A high-output alternator, typically rated between 100 to 200 amps, is crucial as it converts mechanical energy into electrical energy needed for welding.
- Battery: A reliable deep-cycle battery is necessary to store energy and provide a stable power source for the welder, ensuring consistent performance during welding operations.
- Voltage Regulator: This component regulates the voltage output from the alternator, preventing fluctuations that can affect welding quality and equipment safety.
- Welding Leads and Electrode Holder: Heavy-duty welding leads are essential for carrying the current from the welder to the workpiece, while an electrode holder secures the welding rod in place during the welding process.
- Ground Clamp: A strong ground clamp is required to create a solid electrical connection to the workpiece, ensuring effective grounding and preventing stray currents that could lead to weld defects.
- Cooling System: A cooling system, such as fans or heat sinks, is important to dissipate heat generated during welding, thus prolonging the life of the alternator and other components.
- Frame or Mounting Bracket: A sturdy frame or mounting bracket is necessary to securely hold all components in place, providing stability during operation and facilitating ease of transport.
- Welding Mask and Safety Gear: Personal protective equipment, including a welding mask and gloves, is critical for the safety of the operator, protecting against sparks, UV light, and other hazards associated with welding.
A high-output alternator is the heart of a DIY alternator welder, as it must efficiently convert engine power into sufficient electrical output for welding tasks. Selecting an alternator that meets the amperage requirements of your welding projects is essential to ensure effective operation and performance.
A deep-cycle battery supports the alternator by providing a steady power supply, which is especially important in situations where the engine is not running. It allows the welder to function effectively without risking battery depletion too quickly.
The voltage regulator is vital for maintaining consistent voltage levels, which helps in achieving stable arcs during welding. This component protects both the welder and the connected devices from voltage spikes or drops that could lead to damage.
Welding leads and an electrode holder enable the transfer of electrical current to the workpiece and securely hold the welding rod in position, respectively. The quality and gauge of the welding leads can significantly impact the efficiency and effectiveness of the welding process.
A good ground clamp ensures a solid connection to the workpiece, which is crucial for completing the electrical circuit during welding. Proper grounding minimizes the risk of electrical shocks and enhances the quality of the weld.
Incorporating a cooling system, such as fans, can help manage the heat produced during welding operations, thus protecting the alternator and prolonging its lifespan. Overheating can lead to premature failure of the alternator if not adequately managed.
A frame or mounting bracket provides the necessary support for the welder components, ensuring they are securely positioned, which is vital for safety and operational efficiency. A well-constructed frame can also facilitate easy transport and setup.
Lastly, wearing appropriate safety gear, including a welding mask and gloves, is essential to protect the welder from hazardous conditions such as UV radiation, flying sparks, and intense heat generated during the welding process. Safety should always be a top priority in any welding project.
How Do You Select the Best Alternator for Your Welding Needs?
Selecting the best alternator for your DIY welding needs involves considering several key factors.
- Power Output: The power output of the alternator is crucial as it determines the maximum amperage available for welding. Depending on the thickness of the material you plan to weld, you may need an alternator that can produce anywhere from 100 to 300 amps to ensure effective and efficient welding.
- Voltage Regulation: Voltage regulation is important to maintain consistent performance and prevent damage to your welding equipment. Look for alternators with built-in voltage regulators to ensure a stable output, which is essential for achieving high-quality welds.
- Durability and Build Quality: Since welding can involve harsh conditions, the alternator should be built to withstand heat, vibration, and potential exposure to contaminants. Choosing a unit made from high-quality materials with robust construction will increase its lifespan and reliability during welding tasks.
- Compatibility: Ensure that the alternator is compatible with your welding machine and any other equipment you plan to use. Check the specifications for mounting options, belt sizes, and electrical connections to guarantee a seamless integration into your DIY setup.
- Cooling System: A good cooling system is essential to prevent overheating during extended welding sessions. Look for alternators that feature effective cooling designs, such as fans or heat sinks, which help maintain optimal operating temperatures and enhance performance.
- Weight and Size: The size and weight of the alternator can affect the portability and ease of installation in your DIY welder. Choose a compact and lightweight model if you require mobility, but ensure that it still meets your power needs without compromising performance.
- Price and Warranty: Consider your budget when selecting an alternator, but also factor in the warranty offered by the manufacturer. A higher initial investment may be worthwhile if it comes with a solid warranty, as this can provide peace of mind and protection against potential defects.
What Tools and Materials Are Required for Constructing a DIY Welder?
To construct a DIY welder using an alternator, several tools and materials are essential for effective assembly and operation.
- Alternator: The core component of the welder, an alternator converts mechanical energy into electrical energy. Selecting a high-quality alternator, typically from a vehicle, ensures sufficient power output for welding tasks.
- Battery: A suitable battery is required to supply the necessary energy to the alternator. Deep-cycle batteries are often preferred due to their ability to withstand repeated discharging and recharging without damage.
- Welding Leads: These are essential for connecting the welder to the workpiece and the ground. Using high-quality, thick leads minimizes resistance and heat, ensuring efficient welding performance.
- Welder Clamp: A welder clamp is used to securely hold the welding leads in place on the workpiece. This ensures a good electrical connection and stability during the welding process.
- Rectifier: Since an alternator generates alternating current (AC), a rectifier is necessary to convert this AC into direct current (DC) for a more stable welding arc. A bridge rectifier is commonly used for this purpose.
- Cooling System: Welding generates significant heat, so a cooling system (like a fan or radiator) is important to prevent overheating of the alternator and other components. Adequate ventilation and cooling help prolong the life of the welder.
- Frame or Mounting Bracket: A sturdy frame or mounting bracket is needed to hold the alternator and other components securely in place during operation. This helps maintain alignment and stability, ensuring safe and effective welding.
- Tools (Wrenches, Screwdrivers, etc.): Basic hand tools are necessary for assembling the welder. Wrenches and screwdrivers will be needed to connect and secure the components together properly.
- Safety Gear: Personal protective equipment (PPE) such as gloves, welding helmet, and protective clothing are essential for safety during the welding process. Protecting your eyes and skin from sparks and UV radiation is crucial.
How Can You Successfully Build a DIY Alternator Welder?
To successfully build a DIY alternator welder, you need to focus on several key components and techniques:
- Choosing the Right Alternator: Select an alternator with a high amp output, typically around 100-200 amps, to ensure it can provide sufficient power for welding tasks.
- Creating a Solid Mounting System: Design a sturdy mount that securely holds the alternator in place, as vibrations from welding can loosen components and affect functionality.
- Wiring and Connections: Use heavy-gauge wire for connections to minimize resistance and ensure a steady flow of current; ensure all connections are tight and well-insulated to prevent arcing.
- Cooling System: Implement a cooling system, such as a fan or heat sinks, since the alternator can become hot during operation, which may affect performance and longevity.
- Control Mechanism: Integrate a control mechanism to adjust the welding output, which can involve using a potentiometer or a simple on/off switch for basic setups.
- Testing and Calibration: Before using the welder for actual projects, conduct tests on scrap materials to calibrate the welding settings and ensure everything operates smoothly.
The chosen alternator should ideally be from a reliable source and compatible with the intended welding tasks. High-output alternators not only improve welding quality but also reduce the risk of overheating.
A solid mounting system is critical to prevent movement during welding. It should be designed to absorb vibrations and support the alternator without flexing, which can lead to damage over time.
Wiring and connections must be made with care; using appropriate gauge wires helps in managing the high current and minimizes the risk of overheating. Proper insulation and secure connections are vital to avoid electrical failures.
Implementing a cooling system can significantly extend the operational life of your alternator welder. It maintains optimal temperature levels, thereby preventing thermal damage and efficiency loss during prolonged use.
A control mechanism allows for versatility in welding tasks, enabling adjustments to be made based on the material thickness and type. This adaptability can enhance the welder’s effectiveness across various projects.
Finally, thorough testing and calibration are essential to ensure that the DIY alternator welder performs reliably. By experimenting with different settings on scrap metal, you can fine-tune your setup for optimal results before tackling more significant projects.
What Advantages Does an Alternator On Board Welder Offer Over Traditional Methods?
An alternator on board welder offers several advantages over traditional methods of welding.
- Portability: An alternator on board welder is typically more compact and lightweight, making it easy to transport and use in various locations.
- Efficiency: These welders often provide a more efficient power conversion from mechanical energy to electrical energy, allowing for consistent welding performance.
- Fuel Economy: By using the vehicle’s engine to power the alternator, these welders can reduce fuel consumption compared to traditional gas or diesel generators.
- Versatility: An alternator on board welder can be used for multiple applications, including both DC and AC welding, depending on the setup.
- Reduced Noise: Compared to traditional welders that run on gas or diesel, alternator welders tend to operate more quietly, making them suitable for noise-sensitive environments.
Portability is a key feature of alternator on board welders, as they can be easily mounted in trucks or vehicles, allowing welders to work in remote locations without the need for external power sources. This makes them ideal for on-site repairs and construction projects.
Efficiency is another significant advantage, as these systems convert mechanical energy from the vehicle’s engine to electrical energy with minimal loss, which results in better performance and longer operational times during welding tasks.
Fuel economy is enhanced by utilizing the engine’s existing fuel source, reducing the need for separate fuel supplies for traditional generators. This leads to lower operational costs and a smaller environmental footprint.
Versatility is offered through the ability to switch between different welding processes, accommodating various materials and requirements with ease. This flexibility allows users to tackle a broader range of projects without needing multiple machines.
Finally, reduced noise levels make alternator on board welders more suitable for residential areas or where noise regulations apply, allowing for welding activities without disturbing the surroundings.
What Safety Measures Should You Implement When Using a DIY Alternator Welder?
When using a DIY alternator welder, implementing proper safety measures is crucial to prevent accidents and ensure effective operation.
- Personal Protective Equipment (PPE): Always wear appropriate PPE such as gloves, a welding helmet, and protective clothing.
- Ventilation: Ensure that the workspace is well-ventilated to avoid inhaling harmful fumes produced during welding.
- Electrical Safety: Be aware of electrical hazards, including grounding your equipment and using properly rated cables to prevent shocks.
- Fire Safety: Keep a fire extinguisher nearby and remove flammable materials from the welding area to minimize fire risks.
- Equipment Inspection: Regularly inspect your alternator welder and all connected components for wear and damage before use.
- Work Environment: Maintain a clean and organized workspace to reduce the risk of accidents and ensure easy access to tools and equipment.
- Proper Training: If you are inexperienced, consider seeking guidance or training from a qualified welder to familiarize yourself with techniques and safety practices.
Personal Protective Equipment (PPE) is essential, as welding can expose you to intense light, heat, and potential sparks. Wearing gloves, protective clothing, and a welding helmet helps shield your skin and eyes from these hazards.
Ventilation is important because welding can produce harmful fumes and gases, which can be detrimental to your health if inhaled. Working in a well-ventilated area or using exhaust fans will help disperse these fumes and ensure a safer environment.
Electrical safety is paramount when operating a DIY alternator welder. Always ensure that your equipment is properly grounded and use cables that can handle the current to reduce the risk of electric shock or short circuits.
Fire safety cannot be overlooked, as welding generates sparks that can ignite flammable materials. Keeping a fire extinguisher within reach and clearing the area of combustible items will help mitigate fire hazards effectively.
Equipment inspection should become a routine practice before each use; check for frayed wires, loose connections, or any other signs of wear that could compromise safety during operation. Addressing these issues promptly can prevent accidents and equipment failure.
A clean work environment is vital for safety as it minimizes tripping hazards and ensures that tools and materials are easily accessible. Maintaining organization in your workspace can significantly reduce the likelihood of accidents.
Proper training is essential for anyone new to welding, as it equips you with knowledge about techniques and safety protocols. Engaging with experienced welders or taking a course can help build your skills and confidence in operating the equipment safely.
Related Post: