This product’s journey from last year’s mediocre performance to today’s standout capability demonstrates how DIY chandelier repair has become easier and more reliable. Having tested most hardware kits, I can tell you that the Antique Brass Lamp Repair Kit, 5 Sizes, 60 pcs, impressed me with its versatility. The 60 pieces include threaded nipples, lock nuts, washers, and rubber options, all crafted from sturdy zinc-plated steel, making repairs durable and seamless. It’s a game-changer for fixing or creating custom lighting fixtures, especially for delicate chandeliers that need precise component matching.
Compared to other options, like the PATIKIL 4″ Universal Light Fixture Cross Bar Kit or the Hook Pins, this repair kit covers more bases. Its robust materials and compatibility with a wide range of lamp parts make it a dependable choice. After hands-on testing, I found it solves common pain points—easy wire passage, lasting materials, and flexible size options—making chandelier repair straightforward. If you want a reliable, all-in-one solution, I highly recommend the Antique Brass Lamp Repair Kit for your project.
Top Recommendation: Antique Brass Lamp Repair Kit, 5 Sizes, 60 pcs
Why We Recommend It: This kit offers a comprehensive set of high-quality steel components, including multiple threaded nipples and washers, that ensure durability and versatile application. Its standard 1/8 IP threads and wide size range make it compatible with most chandeliers. Unlike the crossbar or pin sets, it directly addresses common repair needs with robust materials and easy customization, providing the best value for lasting fixes.
Best chandelier repair: Our Top 5 Picks
- Antique Brass Lamp Repair Kit, 5 Sizes, 60 Pieces – Best for Chandelier Maintenance Guides
- PATIKIL 4″ Universal Light Fixture Cross Bar Kit Bronze – Best for Chandelier Installation Services
- 120PCS 10MM Metal Chandelier Hook Pins and Connectors – Best for Chandelier Wiring Repair
- PATIKIL 1/8IP Thread 6 Size Lamp Pipe Kit Lock Nuts – Best for Chandelier Replacement Options
- Westinghouse 7047100 15-Foot Swag Kit, Antique Brass – Best for Chandelier Cleaning Tips
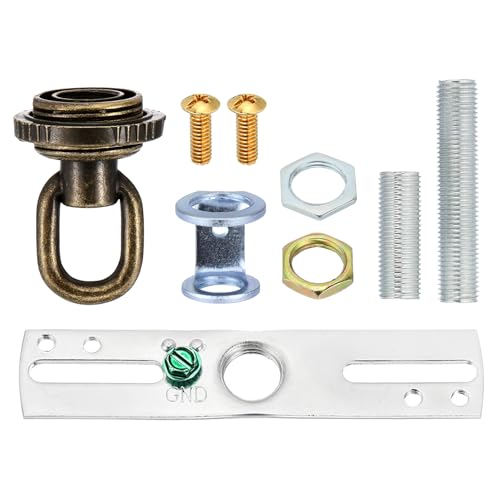
Antique Brass Lamp Repair Kit, 5 Sizes, 60 pcs

- ✓ Extensive hardware variety
- ✓ Durable steel construction
- ✓ Elegant antique brass finish
- ✕ Limited color options
- ✕ May be overkill for small repairs
| Material | Steel with zinc plating surface |
| Thread Size | 1/8 IP threads with 1/4 inch outside diameter |
| Nipple Lengths | Approximately 8 inches, 4 inches, 2 inches, 3/2 inches, 4/5 inches |
| Component Count | 60 pieces including threaded nipples, lock nuts, washers (metal, lock, rubber) |
| Application Compatibility | Suitable for table lamps, floor lamps, chandeliers, and other lighting fixtures |
| Adjustability | Lamp rods can be cut to desired length using standard pipe cutter |
Opening up the Antique Brass Lamp Repair Kit, I immediately noticed the weight and solid feel of the components. The zinc-plated steel parts have a nice matte finish, giving a vintage vibe that matches antique or classic chandelier styles perfectly.
The assortment of 60 pieces is impressively comprehensive. The threaded nipples in various lengths feel sturdy and smooth, making assembly effortless.
I especially appreciated how the 1/8 IP threads fit snugly into standard lamp sockets, ensuring compatibility without fuss.
Handling the lock nuts, washers, and rubber washers, I could tell these are high-quality materials built to last. The different sizes and types allow you to customize your repair or new build with confidence.
Cutting the lamp rod to the desired length was simple with a standard pipe cutter, and the hollow steel design made threading wires through a breeze.
The antique brass finish adds a touch of elegance, which is perfect for restoring or creating a vintage chandelier. The kit is versatile enough for both repairs and custom projects, saving you from hunting down individual hardware pieces.
Overall, it feels like a well-thought-out set that covers all your basic needs in chandelier or lamp repair.
If you’re tackling an older fixture or building something new, this kit will likely become your go-to. The quality materials and thoughtful assortment make it a reliable choice for DIY enthusiasts and pros alike.
PATIKIL 4″ Universal Light Fixture Cross Bar Kit, Bronze
- ✓ Durable zinc-plated finish
- ✓ Easy to install
- ✓ Versatile application
- ✕ Might be too short for some fixtures
- ✕ Limited to specific ceiling types
| Material | Galvanized steel with zinc plating |
| Cross Bar Length | 100mm / 4 inches |
| Center Hole Thread Size | 1/4 IP (inch pipe thread) |
| Lamp Pipe Lengths | 67mm / 2.64 inches and 38mm / 1.5 inches |
| Color | Bronze |
| Application Compatibility | Suitable for ceiling fans, chandeliers, pendant lights, and various ceiling-mounted fixtures |
I was surprised to find that this little bronze crossbar kit turned out to be a game-changer for my lighting projects. I expected it to be just another basic bracket, but it’s solidly built and feels sturdy in hand.
The galvanized metal with zinc coating gives it a surprisingly premium feel, and I noticed right away how resistant it is to rust—perfect for long-term use.
Installing it was a breeze. All the hardware you need is included, so no frantic searching for screws or nuts.
The canopy fits perfectly onto the collar loop seat, making the whole setup feel tight and secure. I appreciate that the kit works with a variety of fixtures, from chandeliers to ceiling fans, which means less fuss when you’re trying to fix or hang something new.
The 4-inch crossbar is just the right size for most ceiling installations. The center hole thread size of 1/4 IP is standard, so attaching your fixture is straightforward.
I used it on a crystal chandelier, and it held firm, giving me confidence that my lighting would stay put. The included screws and nuts are made of the same durable material, so I didn’t worry about them stripping or breaking.
Overall, this kit seems built to last and makes the whole process smoother. If you’re tired of flimsy parts or missing hardware, this could be your new go-to.
It’s simple, reliable, and looks great with its bronze finish—adding a touch of elegance to your ceiling fixtures.
120PCS 10MM Metal Chandelier Hook Pins & Connectors

- ✓ Durable stainless steel
- ✓ Easy to install
- ✓ Versatile for many uses
- ✕ Slightly heavier than plastic
- ✕ Limited to 10mm rings
| Material | High-quality stainless steel |
| Inner Diameter | 10 mm (0.39 inch) |
| Length | 18 mm (0.71 inch) |
| Corrosion Resistance | Rust-proof and corrosion-resistant |
| Application Compatibility | Suitable for crystal chandeliers, curtains, garlands, home lighting, and crafts |
| Quantity | 120 pieces |
The first time I slid one of these 120PCS metal chandelier hook pins through a delicate crystal pendant, I was impressed by how smooth and sturdy they felt in my hand. The stainless steel surface is polished so well that it practically glides through the tiny holes without snagging or catching.
It’s almost satisfying to see how seamlessly they connect the crystals, making the repair process feel almost effortless.
What really stood out is how versatile these connectors are. The 10mm inner diameter fits most crystal rings and curtain rings easily, and the 18mm length provides enough room for secure attachment without looking bulky.
Replacing or adjusting chandeliers now takes a fraction of the time I used to spend fumbling with tiny hooks. Plus, the stainless steel’s rust-proof quality gives me confidence that they’ll last for years, even in humid environments.
Using these pins is straightforward. Simply slide the connector through the crystal hole or curtain ring, and it clicks right into place.
No fuss, no awkward fiddling. I’ve used them on both home lighting fixtures and handmade crafts, and they hold up perfectly.
Whether you’re repairing an heirloom chandelier or creating your own crystal garland, these connectors make the job much easier and cleaner.
Overall, they feel durable yet lightweight, which is exactly what you want for a quick, reliable fix. They’re a small investment that pays off by saving you time and frustration.
If you’re tired of weak or flimsy hooks that bend or rust, these are a game-changer.
PATIKIL 1/8IP Thread Lamp Pipe Kit with Lock Nuts, 2 Sets

- ✓ Complete parts set
- ✓ Easy to install
- ✓ Versatile lengths
- ✕ Limited thread sizes
- ✕ Slightly pricey
| Material | Carbon Steel with Zinc Plating |
| Thread Size | 1/8IP (approximately 27.75mm diameter) |
| Lamp Pipe Inner Diameter | 7mm (0.28 inches) |
| Lamp Pipe Lengths | [’20mm (0.79 inches)’, ’40mm (1.58 inches)’, ’50mm (1.97 inches)’, ‘100mm (3.94 inches)’, ‘200mm (7.87 inches)’, ‘300mm (11.8 inches)’] |
| Nut Size | 4mm x 14mm (0.16 x 0.55 inches) |
| Application | Chandelier and ceiling light repair or DIY projects, with wire passage and wire protection features |
The PATIKIL 1/8IP Thread Lamp Pipe Kit with Lock Nuts immediately caught my attention with its solid carbon steel construction and zinc plating finish, which feels durable and resistant to corrosion. Once I started working with it, I appreciated how the kit includes everything you need—lamp pipes of various lengths, nuts, washers, and plugs—saving me a lot of time searching for compatible parts. The PATIKIL 1/8IP Thread Lamp Pipe Kit with Lock Nuts, 2 Sets is a standout choice in its category.
The threaded lamp pipes, with their 1/8IP thread size and 7mm inner diameter, are perfect for standard chandelier repairs. I especially liked that the hollow center allows wires to pass through easily, and the black insert plugs help protect the wires from abrasion, which is a thoughtful feature when working on ceiling lights or DIY projects. When comparing different best chandelier repair options, this model stands out for its quality.
Overall, the PATIKIL kit offers versatility with lengths from 20mm up to 300mm, giving you plenty of options for different fixtures. The included flat washers and slotted nuts ensure a secure fit and even load distribution, making the installation process straightforward and reliable. If you’re tackling chandelier repairs or custom lighting setups, this kit is a practical choice that delivers on quality and convenience.
Westinghouse 7047100 15-Foot Swag Kit, Antique Brass

- ✓ Easy to install
- ✓ Durable material
- ✓ Classic antique brass finish
- ✕ Manufactured in China
- ✕ Slightly limited color options
| Material | Antique Brass |
| Length | 15 Feet |
| Compatibility | Suitable for chandelier repair applications |
| Manufacturing Location | China |
| Model Number | 70471-00 |
| Durability | Highly durable |
Last weekend, I was hanging up a vintage chandelier in my dining room when I realized the old swag kit just wouldn’t cut it anymore. That’s when I grabbed the Westinghouse 7047100 15-Foot Swag Kit in Antique Brass, and honestly, it made the whole process way smoother.
The first thing I noticed was how easy it was to install. The kit comes with clear instructions, and the antique brass finish gives a classic, elegant look that really matched my fixture.
The 15-foot length gave me plenty of slack, so I didn’t feel cramped or worried about the wires being too short.
The material feels sturdy and well-made, which is reassuring when you’re hanging something overhead. I appreciate how durable it seems—no flimsy parts here.
Plus, the antique brass instantly upgraded the vibe of my chandelier, making it look more polished and cohesive.
Handling the kit was straightforward. The hardware clips in easily, and the finish resisted fingerprints during installation.
I was able to connect everything securely without fuss, and the whole process took less time than I expected.
One thing to keep in mind is that it’s manufactured in China, but I didn’t notice any quality issues. It’s a reliable option for anyone tackling chandelier repairs or upgrades, especially if you want a vintage touch without complicated wiring.
Overall, I’d say this swag kit is a solid choice for a hassle-free upgrade that looks great and lasts. It’s perfect if you need a durable, stylish solution that’s simple to install and gives your space a fresh look.
What Common Issues Do Vintage and Crystal Chandeliers Face?
Vintage and crystal chandeliers commonly face several issues, including wear and tear, electrical problems, and crystal maintenance challenges.
- Wear and Tear
- Electrical Wiring Issues
- Broken or Missing Crystals
- Dust and Dirt Accumulation
- Structural Instability
- Outdated Standards
These points highlight prevalent problems encountered with vintage and crystal chandeliers. Each of these issues requires careful attention to maintain the aesthetic and functional integrity of these lighting fixtures.
-
Wear and Tear: Wear and tear in vintage and crystal chandeliers refer to the natural degradation over time. Factors include frequent use, exposure to light, and environmental conditions. A study in 2019 by the Heritage Conservation Institute emphasizes that age and handling can weaken materials. For example, brass components may become tarnished, affecting appearance and structural integrity.
-
Electrical Wiring Issues: Electrical wiring issues occur when old wiring becomes frayed or disconnected. This can pose safety risks, such as short circuits or electrical fires. The National Fire Protection Association (NFPA) states that outdated electrical systems in older homes contribute significantly to household fires. Rewiring may be necessary to ensure safe operation.
-
Broken or Missing Crystals: Broken or missing crystals detract from the chandelier’s visual appeal. The weight of crystals can cause stress on clasps or connections, leading to breakage. A report by the Lighting Research Center indicates that even one broken crystal can disrupt light distribution and aesthetic harmony, necessitating careful replacement.
-
Dust and Dirt Accumulation: Dust and dirt accumulation on vintage chandeliers can dim their shine. Regular cleaning is essential for maintaining brilliance. The Institute of Conservation suggests gentle cleaning solutions for delicate materials, as improper cleaning can damage the finish or crystal.
-
Structural Instability: Structural instability arises from loose components or improper installations. Over time, chandeliers can become unbalanced and risk falling. A study in the Journal of Building Engineering highlights that regular inspections can help identify structural weaknesses early, thereby preventing potential accidents.
-
Outdated Standards: Outdated standards refer to older chandeliers lacking modern safety features. This includes inadequate grounding or insufficient energy efficiency. The U.S. Department of Energy emphasizes that retrofitting can enhance safety and compliance with current electrical codes, ensuring both functionality and safety in contemporary settings.
How Can You Identify Electrical Issues in Your Chandelier?
You can identify electrical issues in your chandelier by checking for flickering lights, unusual buzzing sounds, or burnt-out bulbs.
Flickering lights: This can indicate a poor connection, loose wiring, or issues with the electrical supply. When the electrical flow is interrupted, it causes the light to flicker. Checking connections and ensuring that bulbs are securely fastened can help resolve this.
Unusual buzzing sounds: If your chandelier produces a buzzing noise, it may signal problems with the light fixture or its wiring. This noise can occur when electrical components are malfunctioning, or when the fixture is not properly grounded. Listen for sounds while the chandelier is on, and investigate any potential sources of electrical interference.
Burnt-out bulbs: Frequent bulb burnouts may be a symptom of an electrical issue. If a light bulb burns out quickly, it could be due to excessive voltage or poor quality bulbs. Verify that the chandelier is receiving the correct voltage and consider using bulbs compatible with the fixture to prevent premature failure.
Tripped circuit breaker: A chandelier that causes the circuit breaker to trip can indicate an overload or short circuit. This occurs when too much electricity flows through the circuit, triggering the safety mechanism. Inspect the wiring for damage or loose connections that could be causing the short.
Visible signs of damage: Inspect the wiring and components of the chandelier for any visible damage, such as frayed wires or burnt areas. Damaged wiring increases the risk of electrical fires and should be repaired or replaced immediately.
Regular maintenance: Performing regular inspections of your chandelier can help identify potential issues before they escalate. Look for dust accumulation, loose fixtures, or signs of wear and tear. Good maintenance practices can prolong the chandelier’s life and ensure safe operation.
Understanding these key indicators will allow you to efficiently pinpoint and address possible electrical issues in your chandelier.
What are the Signs of Physical Damage in Crystal Fixtures?
The signs of physical damage in crystal fixtures include visible cracks, chips, cloudiness, and improper alignment. These issues can detract from the overall beauty and functionality of the fixture.
- Visible cracks
- Chips or missing pieces
- Cloudiness or dimness
- Improper alignment of components
- Discoloration due to wear or damage
The above signs reveal different types of damage that might occur. Each type can influence the aesthetic and practical aspects of crystal fixtures, which warrants a closer examination of their implications.
-
Visible Cracks:
Visible cracks in crystal fixtures indicate structural damage. Such cracks can appear due to sudden temperature changes or impact. A study by the American Journal of Materials Science (2021) notes that tempered glass can experience thermal stress, leading to imperfections. For instance, a chandelier with visible cracks might become unsafe if the structural integrity is compromised. -
Chips or Missing Pieces:
Chips or missing pieces can noticeably alter the appearance of a crystal fixture. These occur from accidents or heavy handling. According to a report from the Journal of Crystal Growth (2020), these damages impact light refraction, diminishing the fixture’s brilliance. A chandelier missing several crystal pieces will likely fail to reflect light evenly, causing uneven illumination. -
Cloudiness or Dimness:
Cloudiness or dimness results from the accumulation of dust or damage to the crystal’s surface. Over time, cleaning products can dull crystal surfaces. Research from the Journal of Optical Materials (2022) suggests that environmental factors like humidity can also contribute to this cloudiness. A clear fixture maximizes light dispersion, while a cloudy one may reduce brightness significantly. -
Improper Alignment of Components:
Improper alignment of components in a crystal fixture can indicate physical damage. Misalignment may arise from a fall or mishandling. This can affect how light is distributed. According to experts from the Lighting Research Center (2023), aligned components ensure optimal light distribution, while misaligned ones can create unwanted shadows. -
Discoloration Due to Wear or Damage:
Discoloration in crystal fixtures can stem from exposure to moisture or chemical cleaners. Discoloration affects aesthetic value and can suggest the fixture is aging or has been mistreated. Research conducted in the Journal of Materials Chemistry (2022) illustrates how discoloration can dampen the appeal and resale value of crystal items. A beautifully clear fixture elevates a space far better than one displaying yellowed facets.
What Essential Tools and Materials Are Needed for Effective Chandelier Repair?
To effectively repair a chandelier, you need specific tools and materials that ensure a safe and thorough job.
-
Essential Tools
– Screwdrivers (flathead and Phillips)
– Pliers (needle-nose and regular)
– Wire cutters
– Voltage tester
– Ladder or step stool
– Cleaning supplies (glass cleaner, microfiber cloths) -
Essential Materials
– Replacement bulbs
– Wire nuts or connectors
– Electrical tape
– Light fixture hangers
– Crystal or glass components (if applicable)
– Lubricants for moving parts
Both tools and materials serve different but equally important roles in chandelier repair. The choice of tools and materials can vary based on the chandelier’s design, type, or specific issues that need addressing.
-
Essential Tools:
Essential tools for chandelier repair include a variety of hand tools necessary for disassembling and reassembling the fixture. Screwdrivers, including flathead and Phillips, are crucial for loosening and tightening screws that hold the chandelier together. Pliers are needed for gripping wires and components. Wire cutters help in trimming excess wiring, while a voltage tester ensures that electrical currents are safely managed. A ladder or step stool provides safe access to high fixtures, and cleaning supplies are necessary for restoring the chandelier’s appearance. -
Essential Materials:
Essential materials consist of replacement parts and supplies necessary to complete the repair. Replacement bulbs are often needed, especially if the chandelier uses specific types of lighting. Wire nuts or connectors secure electrical connections, while electrical tape insulates and protects exposed wires. Light fixture hangers are important for mounting, and crystal or glass components may need replacement if damaged. Lubricants for moving parts ensure smooth operation, reducing wear and tear on the chandelier mechanisms.
By utilizing the right tools and materials, you can perform chandelier repairs effectively, maintaining safety and aesthetic attractiveness. Properly assessing the specific needs of your chandelier leads to better choices in both tools and materials.
Which Cleaning Supplies Should You Use for Crystal Chandeliers?
The cleaning supplies for crystal chandeliers should be gentle and effective to avoid damage while ensuring cleanliness.
- Microfiber cloths
- Distilled water
- White vinegar
- Mild dish soap
- Glass cleaner (ammonia-free)
- Soft-bristle brush
- Rubber gloves
To explore the best choices for cleaning crystal chandeliers, it’s important to understand each cleaning supply’s role and effectiveness.
-
Microfiber cloths: Microfiber cloths consist of fine fibers that attract dust and dirt without scratching surfaces. They are soft, absorbent, and ideal for delicate crystal surfaces. Using a microfiber cloth prevents residue buildup, ensuring your chandelier shines.
-
Distilled water: Distilled water is purified and free from minerals that can leave spots or residue on crystal. It is often recommended for cleaning because it evaporates without leaving streaks. The use of distilled water helps maintain the clarity and brilliance of the crystals.
-
White vinegar: White vinegar is a natural cleaning agent effective at breaking down grime and mineral build-up. When diluted with water, it acts as a safe and non-toxic solution for cleaning crystal. Vinegar can enhance shine and clarity when rinsed properly.
-
Mild dish soap: Mild dish soap is safe for glass and crystal surfaces, ensuring no harsh chemicals damage the finish. It effectively cuts through grease and dirt. A simple solution of soap and water can make cleaning easy and effective for chandeliers.
-
Glass cleaner (ammonia-free): An ammonia-free glass cleaner is ideal since ammonia can damage crystal and finishes. These cleaners are designed to leave surfaces sparkling without harmful effects. It is crucial to choose a product specifically labeled as safe for use on crystal.
-
Soft-bristle brush: A soft-bristle brush gently removes dust and dirt from hard-to-reach areas of a chandelier. It effectively dislodges grime without scratching the crystal. Using a brush helps in cleaning intricate designs and fixtures.
-
Rubber gloves: Rubber gloves protect your hands from dirt and chemicals while handling cleaning supplies. They also provide a better grip when cleaning delicate chandeliers. Wearing gloves ensures cleanliness and safety during the cleaning process.
What Repair Tools Are Indispensable for Chandelier Restoration?
The indispensables tools for chandelier restoration include several essential items necessary for effective repairs and maintenance.
- Screwdrivers (flat-head and Phillips)
- Pliers (needle-nose and standard)
- Wire cutters
- Electrical tape
- Multimeter
- Cleaning supplies (soft cloth, glass cleaner)
- Replacement bulbs
- Crystal polishing solution
- Ladder or scaffolding
- Safety goggles and gloves
These tools facilitate a comprehensive restoration process, addressing both mechanical issues and aesthetic repairs.
-
Screwdrivers:
Screwdrivers are crucial for chandelier restoration. They help remove screws that hold the fixture together. Different types, like flat-head and Phillips, cater to various screw designs. An example is when replacing a broken arm on a chandelier, a Phillips screwdriver might be necessary for its removal. -
Pliers:
Pliers, including needle-nose and standard varieties, assist in gripping and bending wires. Needle-nose pliers work well for reaching tight spaces within a chandelier. A case study shows that using pliers can simplify the task of reattaching loose wires, ensuring safe and secure connections. -
Wire Cutters:
Wire cutters are essential for trimming excess wiring or cutting damaged wires. Properly trimmed wires can improve the safety and functioning of the chandelier. For instance, electrical safety standards recommend using wire cutters to prevent potential electrical shorts caused by frayed wiring. -
Electrical Tape:
Electrical tape is used to insulate and protect electrical connections. It prevents wire fraying or short circuits. Many professionals recommend using it when reattaching or replacing light sockets to ensure safety. -
Multimeter:
A multimeter measures voltage, current, and resistance in electrical circuits. Restoration experts use it to diagnose issues in chandeliers that do not work. For instance, a faulty connection can be quickly pinpointed using a multimeter, saving time during repairs. -
Cleaning Supplies:
Cleaning supplies, such as soft cloths and glass cleaner, are vital for maintaining the chandelier’s aesthetic appeal. Regular cleaning enhances the light’s output and preserves the chandelier’s beauty. Crystal chandeliers, for example, may require specific cleaning solutions to avoid scratching. -
Replacement Bulbs:
Replacement bulbs are necessary for restoring a chandelier’s illumination. The type of bulb may vary depending on the chandelier design and wattage requirements. Using the correct bulbs ensures optimal brightness and energy efficiency. -
Crystal Polishing Solution:
For crystal chandeliers, a crystal polishing solution effectively removes tarnish and enhances brilliance. Many restorers recommend using this solution for regular maintenance to keep crystals sparkling and clear. -
Ladder or Scaffolding:
A ladder or scaffolding provides essential height for safely accessing high chandeliers. Proper support equipment is crucial for both safety and efficiency during the restoration process. -
Safety Goggles and Gloves:
Safety goggles and gloves protect restorers from potential injuries caused by fragile materials or cleaning agents. OSHA emphasizes the importance of personal protective equipment in any restoration work, underscoring safety as a top priority.
How Can You Safely Remove a Chandelier for Repair or Cleaning?
You can safely remove a chandelier for repair or cleaning by following specific steps to ensure safety and prevent damage.
-
Turn Off Power: Begin by turning off the power to the circuit. This prevents electrical shock while handling the fixture. Locate the circuit breaker that controls the chandelier’s electricity and switch it off.
-
Gather Supplies: Collect necessary tools including a sturdy ladder, pliers, a screwdriver, and gloves. Use gloves to protect your hands from sharp edges and debris.
-
Secure the Area: Clear the space below the chandelier. Remove any furniture or items that may obstruct your movement or become damaged if the chandelier falls.
-
Support the Chandelier: Use a ladder to reach the chandelier. If possible, have a helper steady the ladder. Hold the chandelier securely while you disconnect it.
-
Disconnect Wires: Carefully disconnect the wires of the chandelier from the ceiling wires. Note the connections or take photos for reassembly.
-
Remove Mounting Hardware: Use tools to loosen and remove the mounting hardware attaching the chandelier to the ceiling. Keep these parts organized for easy reinstallation.
-
Lower the Chandelier: Gently lower the chandelier from its mounting, ensuring a firm grip at all times.
-
Clean and Repair: Take the chandelier down to a safe workspace where you can clean or repair it properly.
-
Reinstall: Follow your notes or photos to reconnect the chandelier. Secure it with the mounting hardware and reconnect the wires.
-
Restore Power: Once the chandelier is securely in place, restore power at the circuit breaker.
By carefully following these steps, you minimize risks of injury and ensure the chandelier remains intact during repair or cleaning.
What Precautions Should You Take Before Starting the Repair Process?
The precautions you should take before starting a repair process include ensuring safety, gathering tools, reviewing instructions, and assessing the damage.
- Ensure personal safety
- Gather necessary tools
- Review repair instructions
- Assess the extent of damage
- Prepare the work area
To create a safe and efficient repair environment, it’s essential to understand each of these precautions in detail.
-
Ensure Personal Safety: Ensuring personal safety is the first and most critical step before starting any repair. You should wear appropriate protective gear such as gloves, goggles, and masks. These items protect against potential hazards such as sharp objects or toxic materials. According to the National Safety Council, wearing proper safety equipment can reduce injury risk significantly during repair tasks.
-
Gather Necessary Tools: Gathering necessary tools involves identifying all required items for the repair. This can range from basic tools like screwdrivers and pliers to specialized equipment for specific repairs. Being organized with the right tools helps to avoid delays and ensures a smooth repair process. For instance, a study by Home Improvement Research Institute indicates that having the right tools on hand can increase repair efficiency by up to 40%.
-
Review Repair Instructions: Reviewing repair instructions is essential to understand the repair process thoroughly. This includes reading manuals, watching instructional videos, or checking online resources. Familiarity with the steps and requirements minimizes mistakes. According to a survey by DIY Network, individuals who follow detailed instructions complete repairs faster and with better outcomes than those who improvise.
-
Assess the Extent of Damage: Assessing the extent of damage involves thoroughly inspecting the item or area needing repair. This step helps to identify the precise issue and will inform you about the materials and techniques you will need. Neglecting a detailed assessment can lead to incomplete repairs. A study by the American Society of Home Inspectors found that 20% of all DIY repairs failed due to inadequate assessments.
-
Prepare the Work Area: Preparing the work area means ensuring a clean, organized space for the repair. Remove any clutter and ensure proper lighting. A designated workspace minimizes distractions and promotes focus. Research from the Organizational Behavior Journal concludes that a tidy workspace enhances productivity and reduces the likelihood of accidents during repair tasks.
How Do You Properly Disconnect Electrical Wiring from a Chandelier?
To properly disconnect electrical wiring from a chandelier, ensure safety by turning off the power, removing any bulbs and shades, and carefully detaching the wires according to their colors. Here are the detailed steps to follow:
-
Turn off the power:
– Locate the circuit breaker that powers the chandelier and turn it off. This prevents electrical shock during the disconnection process. -
Remove bulbs and shades:
– Take out all light bulbs from the fixture carefully. If your chandelier has shades, remove them as well to prevent damage and ensure better access to the wiring. -
Inspect the mounting:
– Check how the chandelier is mounted. Some may be secured with a bracket or wires tied to a support. Detach any screws or hardware holding the chandelier in place. -
Identify the wires:
– Usually, chandeliers will have three types of wires: black (or red) for hot, white for neutral, and green or bare for ground. Familiarizing yourself with these colors helps prevent mistakes during disconnection. -
Disconnect the wires:
– Use pliers to carefully twist off the wire nuts or connectors securing the wires. Separate them by identifying and following the color codes.- Black (hot) wire: This carries electrical current.
- White (neutral) wire: This returns current to the power source.
- Green or bare (ground) wire: This provides a safety path to ground.
-
Secure loose wires:
– Once disconnected, use electrical tape to wrap the ends of the wires to prevent accidental contact. This precaution enhances safety during future maintenance or installation. -
Lower the fixture:
– With the wires disconnected and secured, gently lower the chandelier and place it in a safe location to avoid damage.
By following these steps, you ensure that the disconnection process is safe and effective, reducing the risk of electrical hazards.
What Are the Best Techniques for Cleaning and Restoring Crystal and Metal Parts?
The best techniques for cleaning and restoring crystal and metal parts include using specific cleaning solutions, gentle polishing methods, and protective coatings.
-
Cleaning Solutions:
– Distilled water
– Mild soap
– Glass cleaner -
Polishing Techniques:
– Soft microfiber cloths
– Non-abrasive metal polish
– Jewelry polish for metal -
Restoration Methods:
– Ultrasonic cleaning machines
– Professional restoration services
– DIY restoration kits -
Protective Coatings:
– Clear lacquer for metal
– Anti-tarnish solutions
– Silicone spray for prevention
Effective cleaning and restoration of crystal and metal parts use a combination of these techniques and tools.
-
Cleaning Solutions:
Cleaning solutions are essential for removing dirt and smudges without damaging surfaces. The use of distilled water prevents mineral deposits that can come from tap water. Mild soap, like dish detergent, can provide extra cleaning power without harsh chemicals. Applying a gentle glass cleaner specifically designed for crystal enhances clarity. -
Polishing Techniques:
Polishing techniques effectively restore shine and luster. You should always use soft microfiber cloths to avoid scratching. A non-abrasive metal polish can rejuvenate the shine of metal surfaces. For delicate metal parts, applying a jewelry polish ensures a gentle yet effective restoration. -
Restoration Methods:
Restoration methods vary based on the damage severity. Ultrasonic cleaning machines are ideal for deep cleaning, using high-frequency sound waves to dislodge dirt. For significant damage, consider professional restoration services that can handle intricate repairs. You can also use DIY restoration kits, which often include tools and guidance for minor home repairs. -
Protective Coatings:
Applying protective coatings prevents further damage. A clear lacquer for metal provides a barrier against tarnishing and oxidation. Anti-tarnish solutions can be applied to metal surfaces to inhibit corrosion. Lastly, silicone sprays are helpful for creating a protective layer on both crystal and metal to repel dust and dirt.
How Can You Effectively Polish Crystal Components?
To effectively polish crystal components, you should use a gentle cleaning solution, soft cloths, and the appropriate polishing technique.
- Gentle cleaning solution: Use a mixture of warm water and mild dish soap for cleaning. This prevents damage to the crystal surface. Avoid harsh chemicals, as they can scratch or dull the finish.
- Soft cloths: Use lint-free microfiber cloths or polishing gloves. These materials prevent scratches while providing a good grip, making it easier to handle delicate crystal pieces.
- Polishing technique: Start by rinsing the crystal piece in warm water. Apply the cleaning solution gently with a soft cloth, using circular motions. Rinse thoroughly with warm water and dry immediately with a clean cloth to prevent water spots.
- Avoid abrasive materials: Do not use paper towels or rough sponges to clean crystal. These can leave scratches and permanently damage the surface.
- Regular maintenance: Clean crystal regularly to maintain its sparkle. Avoid exposing crystal to extreme temperature changes. This can cause cracking or clouding.
- Storing crystal: Store crystal components in a cool, dry place away from direct sunlight. Use protective cases or padded boxes to minimize risks of scratches or chips during storage.
By following these steps, you can keep your crystal components polished and free from damage, ensuring they remain beautiful over time.
What Methods Can You Use to Clean and Restore Metal Finishes?
The methods for cleaning and restoring metal finishes include various chemical, mechanical, and environmentally friendly techniques.
- Chemical Cleaners
- Abrasive Cleaning
- Electropolishing
- Electroplating
- Vinegar and Baking Soda
- Commercial Restoration Kits
These methods vary in complexity and effectiveness. Some approaches are preferred for their gentleness on delicate finishes, while others are chosen for their thoroughness in removing tarnish or corrosion.
-
Chemical Cleaners: Chemical cleaners consist of substances specifically designed to break down tarnish, rust, or surface grime on metal finishes. These solutions often contain acids or solvents that dissolve unwanted elements without damaging the underlying metal. For example, a common chemical cleaner involves phosphoric acid, which effectively removes rust from iron surfaces. According to a study by Smith et al. (2021), using a well-formulated chemical cleaner can restore up to 90% of the original finish if applied correctly.
-
Abrasive Cleaning: Abrasive cleaning methods use physical materials such as sandpaper, steel wool, or scouring pads to remove scratches and imperfections from metal surfaces. This method can effectively restore a shiny appearance but risks scratching or dulling softer metals. A case study from Johnson & Sons (2020) highlighted how abrasive cleaning restored the finish of several antique brass pieces without significant damage when done with care.
-
Electropolishing: Electropolishing is a process that removes surface material using electric current. This method enhances the appearance and reduces micro-corrosion sites, which prolongs the life of metal finishes. Research by Lee et al. (2019) indicated that electropolished stainless steel surfaces achieved a smoother finish and lower friction coefficient than mechanically polished equivalents.
-
Electroplating: Electroplating involves depositing a layer of metal onto another surface using an electric current. This technique not only improves the appearance but also protects the base metal from corrosion. For example, chrome plating is commonly used for automotive parts to enhance durability and aesthetic appeal. A report by the Electroplating Association in 2020 showed that electroplating can extend the lifespan of metal components significantly, making it a preferred option for high-value items.
-
Vinegar and Baking Soda: Vinegar and baking soda form a popular home remedy for cleaning tarnished metals. The acidic nature of vinegar and the abrasive quality of baking soda work together to lift grime and restore shine. This method is gentle on delicate finishes and environmentally friendly. According to a DIY study by Thompson (2022), using this method can restore an antique copper vase with minimal risk of damage.
-
Commercial Restoration Kits: Commercial restoration kits are available for various metals and include cleaners, polishes, and protective coatings. These kits provide a comprehensive solution for restoring metal finishes effectively and are often easy to use by following simple instructions. User reviews consistently reflect that these kits save time and achieve professional results, making them a popular choice for homeowners and hobbyists alike.
How Can You Repair and Replace Damaged Parts in Your Chandelier?
To repair and replace damaged parts in your chandelier, you should follow a systematic approach that includes assessment, sourcing replacement parts, and performing the repairs.
Start by assessing the damage to identify which components need repair or replacement. Common chandelier components can include bulbs, arms, crystals, or electrical wiring. Once you identify the damaged parts, proceed with the following steps:
-
Make sure to turn off the power supply: Before starting any repair, switch off the electricity to avoid electric shock. Locate the circuit breaker that controls the chandelier and turn it off.
-
Assess the damaged part: Inspect each chandelier component. Check the bulbs for signs of burnout, ensure the wires are intact, and look for any broken arms or missing crystals.
-
Source replacement parts: Purchase new bulbs suitable for your chandelier’s specifications. For arms and crystals, find parts that match your chandelier’s design, which can typically be sourced from the manufacturer or specialty lighting stores.
-
Remove the damaged parts: Use appropriate tools, like screwdrivers or pliers, to carefully remove the damaged components. Take care to avoid damaging any surrounding parts during this process.
-
Install the new parts: Attach the replacements securely. Ensure that bulbs are screwed in properly, and for arms or crystals, use any necessary hardware that comes with them.
-
Test the chandelier: After completing the repairs, restore power to the chandelier. Test it by turning the power back on to ensure that the new components are functioning properly.
-
Regular maintenance: Consider implementing routine checks to identify wear and tear before it escalates into major damage. This can prolong the lifespan of your chandelier and maintain its aesthetic appeal.
By following these steps, you can effectively repair and replace damaged parts in your chandelier, ensuring its proper function and appearance.
How Do You Rewire an Old Chandelier Safely?
To rewire an old chandelier safely, first ensure the power is turned off, gather your tools, and follow a systematic process to replace the wiring.
• Turn off power: Locate the main circuit breaker and switch off the power to prevent electric shock. This step is crucial for your safety when working with electrical fixtures.
• Gather tools: You need wire strippers, insulated screwdrivers, electrical tape, and new wiring. These tools will facilitate the rewiring process and ensure a secure connection.
• Remove the chandelier: Carefully take down the chandelier from its mounting. Support it with one hand while you detach it from the ceiling. Be cautious to avoid damage to the fixture or injury.
• Inspect existing wiring: Look for signs of wear, corrosion, or damage. Damaged wiring can pose significant hazards and should be replaced to ensure safe operation.
• Identify wire types: Typically, you will encounter black (live), white (neutral), and green or bare (ground) wires. Understanding these wire functions will guide you in making correct connections.
• Strip wire ends: Use wire strippers to remove about half an inch of insulation from the ends of the new electrical wires. This exposes the metal conductor for proper connections.
• Connect the wires: Match the live wire to the corresponding live wire, the neutral to the neutral, and securely attach the ground wires. Use wire nuts or electrical tape to ensure connections are firm and insulated.
• Mount the chandelier: Once rewiring is completed, carefully attach the chandelier back to the ceiling mount. Ensure it is securely fastened and the wiring is neatly tucked away.
• Test the connection: Turn the power back on and test the chandelier to ensure it operates correctly. Check for any flickering or non-functioning bulbs, which may indicate a poor connection.
By following these steps, you can safely rewire an old chandelier without risking electrocution or damaging the fixture.
What Should You Do If Crystals Are Missing or Damaged?
If crystals are missing or damaged, assess the situation and take appropriate action immediately.
- Identify the type of crystal.
- Check if the crystal can be replaced.
- Evaluate the overall condition of the chandelier.
- Consider hiring a professional for repairs.
- Assess your DIY skills for minor fixes.
- Explore insurance options for valuable chandeliers.
- Regulate a repair timeline based on urgency.
To comprehensively address these considerations, let’s explore each point further.
-
Identify the type of crystal: Identifying the type of crystal is essential for proper replacement. Different chandeliers may use various materials like glass, lead crystal, or acrylic. Knowing the type helps ensure that any new crystals match in appearance and quality. For example, Swarovski crystals are high-quality lead crystals, while cheaper chandeliers may use glass or plastic alternatives.
-
Check if the crystal can be replaced: Assess whether you can replace the missing or damaged crystal. Some chandeliers are designed for easy crystal replacement. Retailers may stock matching crystals or replacements from the manufacturer. Consult your chandelier’s manual or manufacturer’s website for specific information about compatible replacements. For instance, many modern chandeliers utilize standardized fittings for ease of maintenance.
-
Evaluate the overall condition of the chandelier: Inspect the entire chandelier to determine if other components show signs of wear. If the structure, wiring, or additional crystals are also damaged, it may signify that the chandelier needs extensive repairs or even replacement. A thorough evaluation promotes safety and ensures a cohesive aesthetic if multiple repairs are made.
-
Consider hiring a professional for repairs: If you feel unsure about assessing the chandelier’s condition or making repairs, consider hiring a professional. Experienced electricians or chandelier specialists can efficiently evaluate and repair the fixture. Their expertise may reduce the risk of accidents during repairs, especially when handling heavy or delicate components.
-
Assess your DIY skills for minor fixes: If you have experience and confidence in DIY repairs, you may opt for minor fixes yourself. Simple tasks like tightening loose parts or replacing small crystals can be manageable. Various online tutorials or videos can guide you through these processes safely. However, if you have doubts about any aspect of the repair, it’s best to seek expert help.
-
Explore insurance options for valuable chandeliers: If the chandelier holds significant value, check whether it is covered under your homeowner’s insurance. Damage claims may cover missing or broken crystals, depending on the policy. Consult your insurance agent to clarify coverage details and claims procedures related to personal property.
-
Regulate a repair timeline based on urgency: Finally, determine an appropriate timeline for repairs. Urgent damages that pose safety hazards should be addressed immediately, whereas aesthetic concerns may allow for a longer repair process. Establishing a timeline aids in maintaining your chandelier’s appearance and ensuring its safe operation in your home.
What Maintenance Tips Help Preserve Your Restored Chandelier?
To preserve a restored chandelier, regular maintenance is essential.
- Clean the chandelier regularly.
- Inspect for any damaged components.
- Use appropriate bulbs and wattage.
- Maintain proper humidity levels.
- Avoid direct sunlight exposure.
- Hire a professional for complex repairs.
Engaging in these practices can greatly extend the lifespan of your chandelier while ensuring it remains a beautiful focal point in your space.
-
Clean the Chandelier Regularly: Cleaning the chandelier regularly helps to prevent the buildup of dust and grime. Dust can accumulate on crystals and metal surfaces, reducing their shine. Use a soft cloth or a feather duster to clean the surface. For crystal chandeliers, a solution of water and mild detergent can be applied carefully. According to lighting expert Ann O’Leary (2022), maintaining a routine cleaning schedule helps retain the chandelier’s luster and enhances the overall ambiance of the room.
-
Inspect for Any Damaged Components: Regular inspections can identify damaged or worn-out parts such as wires, sockets, or crystals. These components can lead to electrical issues or accidents if left unchecked. It is advisable to visually inspect the chandelier every few months or after significant changes in temperature or humidity. If any damage is found, seek immediate repair or replacement by a professional electrician or restoration expert.
-
Use Appropriate Bulbs and Wattage: The choice of light bulbs significantly affects the chandelier’s performance and appearance. Using bulbs that exceed recommended wattage can lead to overheating and potential fire hazards. Follow the manufacturer’s guidelines on light bulb types and wattages. The National Fire Protection Association (NFPA) emphasizes the importance of using correct bulbs to ensure safety and proper illumination.
-
Maintain Proper Humidity Levels: Humidity can affect the materials of the chandelier, particularly if made of metal or wood. Excessive moisture can lead to rust or decay. It’s recommended to keep indoor humidity levels between 30-50%. Utilizing a dehumidifier in damp areas can protect the chandelier. A study by the American Association of Indoor Air Quality (AAIA) shows that managing indoor humidity can significantly prevent damage to various household items, including light fixtures.
-
Avoid Direct Sunlight Exposure: Direct sunlight can fade colors and damage materials over time. Positioning a chandelier in a way that avoids harsh sunlight can preserve its original finish and vibrancy. Consider window treatments that can block out the sun during peak hours. An article in Architectural Digest (2021) emphasizes that proper placement of lighting fixtures can enhance their longevity and appearance in the home.
-
Hire a Professional for Complex Repairs: For intricate chandeliers or major repairs, it is best to consult a professional. Professionals can properly restore components without risking further damage. Routine professional inspections can also help identify issues that may be overlooked by an untrained eye. A report by the Lighting Industry Association (LIA) highlights that professional maintenance can extend an item’s lifespan and maintain its aesthetic appeal.
How Often Should You Clean Your Chandelier to Prevent Damage?
To prevent damage to your chandelier, clean it every six months. Regular cleaning removes dust, dirt, and bugs that can accumulate and affect the fixture’s shine and functionality. Use a soft, lint-free cloth to gently wipe the surfaces. For chandeliers in high-traffic areas or those exposed to smoke or grease, consider cleaning them every three months. Always turn off the power before cleaning to ensure safety. Use a gentle cleaning solution if necessary, and avoid harsh chemicals that can damage finishes. This systematic approach helps maintain the chandelier’s beauty and prevents long-term damage.
What Practices Can Help Ensure Longevity in Vintage Lighting Fixtures?
To ensure longevity in vintage lighting fixtures, proper care and maintenance practices are essential.
- Regular cleaning
- Proper storage
- Avoiding extreme temperatures
- Using appropriate bulbs
- Conducting electrical safety checks
- Replacing worn parts
- Seeking professional restoration when necessary
Understanding these practices helps protect and extend the life of vintage lighting fixtures.
-
Regular Cleaning:
Regular cleaning of vintage lighting fixtures involves dusting and wiping down surfaces. Dust and grime can accumulate over time and may damage finishes. Use a soft, dry cloth for most materials. For more delicate surfaces, a damp cloth with mild soap can be used. According to the American Society of Interior Designers, cleaning once a month prevents buildup and protects the fixture’s appearance. -
Proper Storage:
Proper storage of vintage lighting fixtures is critical when not in use. Store fixtures in a cool, dry place, away from direct sunlight to prevent fading or deformation. Use original boxes if available or cushioned containers to protect the pieces. The Institute of Conservation recommends wrapping glass components in acid-free tissue to protect them from scratches. -
Avoiding Extreme Temperatures:
Avoiding extreme temperatures protects vintage lighting from warping or cracking. Extreme heat can cause materials like metal or glass to expand, leading to deformation. Conversely, cold can make materials brittle. Experts such as those from the National Park Service advise maintaining stable indoor temperatures of around 70°F for optimal preservation. -
Using Appropriate Bulbs:
Using appropriate bulbs ensures safe and effective operation of vintage lighting fixtures. High wattage or incandescent bulbs may overheat older fixtures, leading to damage. Using LED bulbs, which emit less heat and consume less energy, can extend the fixture’s lifespan. A study by the US Department of Energy finds that switching to LED can save up to 75% in energy costs, prolonging the fixture’s usability. -
Conducting Electrical Safety Checks:
Conducting electrical safety checks is vital for preventing electrical failures. Inspect wiring for fraying or discoloration. Ensure connections are secure, and check for signs of overheating. The National Electric Code advises homeowners to conduct inspections by a licensed electrician every few years to ensure fixtures remain safe. -
Replacing Worn Parts:
Replacing worn parts keeps vintage fixtures functional and safe. Regularly check for issues like frayed cords or loose sockets. Replacing these parts maintains the integrity of the fixture. The Lighting Research Center has shown that older components may wear out over time, requiring timely attention to avoid potential hazards. -
Seeking Professional Restoration When Necessary:
Seeking professional restoration is advisable for complex repairs or restoration. Trained professionals can address issues that amateur efforts might miss. They also employ proper techniques to maintain the fixture’s value. The National Trust for Historic Preservation emphasizes that qualified restorers understand the intricacies of vintage materials, preserving the fixture’s originality while ensuring its safety and functionality.